

Author: guitartakespractice
Study in A Minor
Please keep in mind the following when practicing this song:
- Use the suggested right hand fingering throughout the entire song – p i m i
- Use a metronome and work on evenly spacing four notes for every beat (sixteenth notes)
- Accent the note that is played with the thumb. It is the melody of the song.
- Watch the video below for a demonstration of the song “Study in A Minor”.
Chicago Blues
Chicago Blues is found in the additional music section of the book “I’ve Always Wanted to PLAY GUITAR.”
Chicago Blues has a simple 2 measure intro followed by a 12 measure progression in the key of E. Keep the following in mind while practicing this song:
- Use the fingering given in the music.
- Swing the eighth notes.
- Play along to the video and also be sure to download the play along track that is included with the book. (login at http://www.youcanplayguitar.com)
- There is a bonus intro at the end of the video. This will be given as a handout to those taking lessons here at The Guitarist.
Practice Tips
Here are a few PRACTICE TIPS that I have posted at the studio:
- Aim to practice at least 30 minutes 5 to 6 days a week.
- Accomplish something every practice session.
- Use a metronome and challenge yourself to play each piece at the proper tempo.
- Do not sacrifice quality for speed.
- Inch by inch it’s a cinch (work on small sections of music).
- TV time is great practice time (work on bar chords, scales, etc).
- Don’t be hard on yourself (practice makes better – nobody is perfect).
- Trying it one time is not practice. Play it 100 times.
Holding a Pick
You would think that holding a pick between your thumb and index finger would be simple. However, teaching a student how to hold and use a pick is similar to teaching a child how to hold and use a pencil for the first time. The photo below shows the ideal way to hold the pick.
- Notice that the point of the pick is coming out of the side of the thumb.
- The pick is held between the thumb and the side of the index finger (towards the finger tip).
- Don’t squeeze the pick too hard. Hold it just enough that you won’t drop it and you feel that you still have some mobility in all your fingers.
Learning how to use a pick is critical (for those that use a pick) for producing good tone on the guitar. If you hold the pick too tight, you may hear lots of buzzing and a tone that is not pleasing to your ears. Hole the pick too loose, and the sound of your instrument will not project well (and you may drop the pick right into the sound hole). I guess what I’m trying to say is you need to hold the pick “just right.” It takes time to develop the “feel” of using a pick, just like it takes time for a child to get the “feel” of writing with a pencil.
PICK EXERCISE
Here are three simple exercises using the pick.
- Strike each string with a down stroke four times. Be sure you strike each note evenly. By this I mean the tone should be the same each time, and you should strike each string at the same pace. Be sure your down stroke moves the pick towards the guitar (or the next string) and not away from the guitar.
- Repeat the above exercise, but follow your down stroke with an upstroke.
- Repeat both exercise, but now try to play all the strings as quiet and soft as possible. Then try it loud. Finally, try it somewhere in between (medium loud). It’s hard to play soft with a real tight grip on your pick. As you play louder, you may grip a little harder.
Holding and Playing Notes
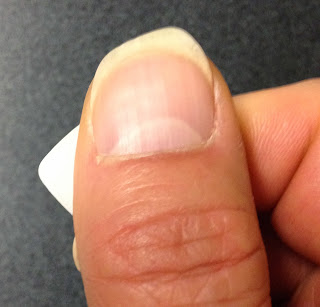
The hand that you use to hold down strings is called your fret hand. For most players, this is the left hand. Here are a few tips on using this hand properly.

- Play on the very tip of your fingers. The top joint of your finger should be about level with the string and the tops of your finger nails will be facing up (see first photo).
- The thumb should be low on the guitar neck, opposite your middle finger (see second photo).
- Play as close to the fret as you can, but not on it.
- Be sure to press the string all the way down until it touches the wood on the guitar neck.
- Use just enough pressure to make the note work. There is no benefit to squeezing the note hard.
Try playing a note on each string on the guitar. Pick any fret that you would like to play.

Lesson One – Getting Started
Be sure to read this lesson. Your first week of practice is critical. Be sure to make an effort to find a comfortable sitting position, to play on the very tips of your fingers, and to hold the pick properly.
Read through this lesson, try all the exercises, and go over the Right Hand and Left Hand Check List.
You can play guitar!
Lesson Thirteen – Fingerstyle Patterns
Memorize the 4/4 and 3/4 time fingerstyle patterns given in this lesson. Please remember:
- Your thumb will play the root of each chord. Up to this point in the book, the root is the lowest note of the chord.
- Each pattern is made up of eighth notes. That is, you will play two notes, evenly spaced, for every tap of your foot (or click on your metronome).
- The real work is going from chord to chord. Try pairing up a few of your favorite chords.
- Below are two video demonstrations. In the first video, I am using the four/four pattern on an Em chord. In the second video, I am using the three/four pattern on an Em chord.
Lesson Twelve – “Aura Lee”
If you think this song sounds like Elvis Presley’s “Love Me Tender,” you’re right. Here’s what you should keep in mind when practicing this song:
- This song plays best in the open position. That is the first three frets, including the open strings.
- Be sure to play the melody legato – “smooth and connected.”
- Be sure to learn the new chords – E and G7.
- A basic 4/4 strum is all that is need to accompany the melody.
“Amazing Grace”
I hope you enjoy playing this great melody. Here are a few practice tips:
- “Amazing Grace” has an incomplete measure. Notice the first measure has only a quarter note. This is called a pick-up note and should be played on beat three.
- Watch out for notes that are “tied” together. You can read about ties in Lesson Five.
- All the notes for “Amazing Grace” can be found in the fifth position.
- Strive to connect the notes and play smoothly – legato.
